
Table of Contents
1.0 Scope
2.0 Complete Mold Inspection
3.0 Limited Mold Inspection
4.0 Standards of Practice
4.1 Roof
4.2 Exterior and Grounds
4.3 Basement, Foundation, Crawlspace & Structure
4.4 Heating, Cooling and Ventilation
4.5 Plumbing
4.6 Attic, Ventilation & Insulation
4.7 Interior
4.8 Moisture, Humidity & Temperature
5.0 IAC2 Mold Sampling Procedures
5.1 General Comments
5.2 Air Flow Rate
5.3 Rotameter
5.4 Surface Sampling
5.5 Outdoor Air Sampling
5.6 Indoor Air Sampling
5.7 Mold Decision Chart
6.0 Limitations, Exceptions & Exclusions
7.0 Definitions
1.0 Scope
1.1 The purpose of this standard is to provide standardized procedures to be used for a mold inspection. There are two types of mold inspections described in the IAC2 Mold Inspection Standards of Practice:
(1) Complete Mold Inspection (Section 2.0)
(2) Limited Mold Inspection (Section 3.0)
1.2 Unless the inspector and client agree to a limitation of the inspection, the inspection will be performed at the primary building and attached parking structure. Detached structures shall be inspected separately.
1.3 A mold inspection is valid for the date of the inspection and cannot predict future mold growth. Because conditions conducive to mold growth in a building can vary greatly over time, the results of a mold inspection (examination and sampling) can only be relied upon for the point in time at which the inspection was conducted.
1.4 A mold inspection is not a home (property) inspection.
1.5 A mold inspection is not a comprehensive indoor air quality inspection.
1.6 A mold inspection is not intended to eliminate the uncertainty or the risk of the presence of mold or the adverse effects mold may cause to a building or its occupants.
2.0 Complete Mold Inspection
2.1 The inspector shall perform:
- a non-invasive visual examination of the readily accessible, visible, and installed systems and components of the building (listed in Section 4.0 Standards of Practice)
- moisture, temperature and humidity measurements (refer to Section 4.8 Moisture, Humidity, and Temperature)
- mold samples according to the IAC2 Mold Sampling Procedures (refer to Section 5.0 IAC2 Mold Sampling Procedures)
2.2 The inspector shall report:
- moisture intrusion;
- water damage;
- musty odors;
- apparent mold growth;
- conditions conducive to mold growth;
- results of a laboratory analysis of all mold samplings taken at the building; and
- any system or component listed in Section 4.0 Standards of Practice that were not inspected and the reason(s) they were not inspected.
3.0 Limited Mold Inspection
The limited mold inspection does not include a visual examination of the entire building, but is limited to a specific area of the building identified and described by the inspector. As a result, moisture intrusion, water damage, musty odors, apparent mold growth, or conditions conducive to mold growth in other areas of the building may not be inspected.
3.1 The inspector shall describe:
- the room or limited area of the building in which the Limited Mold Inspection is performed
3.2 The inspector shall perform:
- a limited non-invasive visual examination of the readily accessible, visible, and installed systems and components located only in the room or limited area (as described in previous Section 3.1).
- mold samples according to the IAC2 Mold Sampling Procedures (see Section 5.0 IAC2 Mold Sampling Procedures)
3.3 The inspector shall report:
- moisture intrusion,
- water damage,
- musty odors,
- apparent mold growth, or
- conditions conducive to mold growth; and
- results of a laboratory analysis of all mold samplings taken at the building
4.0 Standards of Practice
4.1 Roof
I. The inspector shall inspect from ground level or eaves:
A. The roof covering.
B. The roof drainage system, including gutters and downspouts.
C. The vents, flashings, skylights, chimneys, and any other roof penetrations.
II. The inspector is not required to:
A. Walk on any roof surface.
B. Predict the service life expectancy.
C. Perform a water test.
4.2 Exterior and Grounds
I. The inspector shall inspect from the ground level:
A. The cladding, flashing and trim.
B. Exterior doors, windows, decks, stoops, steps, stairs, porches, railings, eaves, soffits and fascias.
C. The exterior grading surrounding the building perimeter.
D. Items that penetrate the exterior siding or covering materials.
II. The inspector is not required to:
A. Inspect underground drainage systems.
B. Window well drainage
C. Inspect defects not related to mold growth or moisture intrusion.
4.3 Basement, Foundation, Crawlspace, and Structure
I. The inspector shall inspect:
A. The foundation, basement, or crawlspace including ventilation.
B. For moisture intrusion
II. The inspector is not required to:
A. Operate sump pumps with inaccessible floats.
B. Inspect for structural defects not related to mold growth or moisture intrusion.
4.4 Heating, Cooling and Ventilation
I. The inspector shall inspect:
A. The air handler, circulating fan, and air filter.
B. The condensate pump.
C. Readily visible ductwork.
D. Representative number of supply and return air registers.
E. The central humidifier.
F. The central air conditioning unit.
II. The inspector is not required to:
A. Inspect the air conditioning coil if not readily accessible.
B. Inspect the condensate pan if not readily accessible.
C. Test the performance or efficiency of the HVAC system.
D. Inspect the interior of ductwork system.
4.5 Plumbing
I. The inspector shall inspect:
A. The readily visible main water line.
B. The readily visible water supply lines.
C. The readily visible drain, waste, and vent pipes.
D. Hot water source.
E. Fixtures such as toilets, faucets, showers and tubs.
II. The inspector is not required to:
A. Test the showers and tubs by filling them with water
B. Test whirlpool tubs, saunas, steam rooms, or hot tubs.
C. Inspect for plumbing defects that are not related to mold growth or moisture intrusion.
4.6 Attic, Ventilation & Insulation
I. The inspector shall inspect:
A. Insulation.
B. Ventilation of attic spaces.
C. Framing and sheathing.
II. The inspector is not required to:
A. To move, touch, or disturb insulation.
B. Inspect for vapor retarders.
C. Break or otherwise damage the surface finish or weather seal on or around access panels and covers.
4.7 Interior
I. The inspector shall inspect:
A. The walls, ceilings, floors, doors and windows.
B. The ventilation in the kitchen, bathrooms and laundry.
C. Whole-house ventilation fans
II. The inspector is not required to:
A. Inspect for interior defects that are not related to mold growth or moisture intrusion.
4.8 Moisture, Humidity, and Temperature
I. The inspector shall measure:
A. Moisture of any room or area of the building that has moisture intrusion, water damage, moldy odors, apparent mold growth, or conditions conducive to mold growth.
B. Humidity of any room or area of the building (at the inspector’s discretion).
C. Temperature of any room or area of the building (at the inspector’s discretion).
5.0 IAC2 Mold Sampling Procedures
Table of Contents
5.1 General Comments
5.2 Air Flow Rate
5.3 Rotameter
5.4 Surface Sampling
5.4.1 Area of Concern – Take One Sample
5.4.2 No Areas of Concern – Not Required
5.4.3 Swab
5.4.4 Tape
5.4.5 Carpet
5.5 Outdoor Air Sampling
5.5.1 Two Outdoor Samples
5.5.2 Upon Arrival
5.5.3 Weather
5.5.4 Location
5.6 Indoor Air Sampling
5.6.1 Closed-Building Conditions
5.6.2 HVAC
5.6.3 Indoor Air
5.6.4 Sampling
5.7 Mold Sampling Decision Chart
5.1 General Comments
- Use the IAC2 Mold Sampling Decision Chart and the IAC2 Standards of Practice to assist in deciding when and where to take samples in a building.
- Samples of the indoor air and the outside air should be taken for comparison. There should not be any mold inside the house that is not found outside. The concentration of mold inside a home should not be higher than the concentration of mold outside.
- Keep in mind that mold spores in the air being sampled can vary greatly in relation to the life cycle of the mold, atmospheric and environmental conditions, and the amount of ventilation. There are seasonal and diurnal variability in airborne mold at an indoor residential environment.
- Air sampling may be necessary if the mold growth is suspected (for example, musty odors), but cannot be identified by a visual examination. The purpose of such air sampling is to determine the location and/or extent of mold contamination as well as a simple confirmation that mold growth exists somewhere in the building. All mold spores have a source, and identifying the source is the goal.
- Because the outdoor sample is the control, and it is used to compare with the indoor sample, the samples should be collected as close as possible in time and under the similar conditions. Air samples should be collected at the same air flow rate, for the same duration of time, near the same height above the floor in all rooms that are sampled indoors, and using the same type of collection device.
5.2 Air Flow Rate
- There are many different types of air pumps, measurement meters, and spore collectors that can be used for an air sample at a mold inspection. The air pump should be adjusted to collect air at a flow rate that is recommended by the manufacturer of the collection device.
- The flow rate could be 15, 10 or even 5 liters per minute. The result of an air pump sample is recorded in spores per meter cubed (spores/m3).
- If the air flow rate is too fast, the spores will bounce off the collector plate or slide and will not stick. If the airflow rate is too slow, the spores float around the collector plate or slide and will not stick.
5.3 Rotameter
- Rotameters are air flow meters that provide field accuracy in an easy-to-read instrument. The principle of operation is simple: air flow passes through a vertical, tapered tube and pushes a small ball or float having a diameter slightly less than the smaller tube end. As the little ball rises, the clearance between the ball and the tube wall increases. The ball becomes stationary when the diameter of the tube is large enough to allow the total airflow past the ball. The flow rate is determined by reading the number on the tube at the middle position of the stabilized ball.
5.4 Surface Sampling
- Surface sampling can provide information regarding whether the visible apparent mold is in fact actual microbial growth (mold) or not, measure the relative degree of the mold contamination, and can serve to confirm that the sampled mold growth may be producing mold spores in the air.
5.4.1 Area of Concern – Take One Sample
- If there is an area of concern (a room or area with moisture intrusion, water damage, musty odors, apparent mold growth, or conditions conducive to mold growth), the inspector shall perform at least one (1) surface sample in EACH area of concern.
- Additional surface samples may be performed at the discretion of the inspector.
5.4.2 No Areas of Concern – Not Required
- If there are no areas of concern (no moisture intrusion, no water damage, no musty odors, no apparent mold growth, and no conditions conducive to mold growth), the inspector is not required to perform a surface sampling.
- Surface samples may be performed in other areas of the building at the discretion of the inspector.
5.4.3 Swab
- A swab comes inside a plastic tube container. The cellulose swab is moistened with a liquid preservative stored in an ampoule at one end of the tube container. Any bacteria collected with the swab are transferred via the swab into a tube. The tube is sent directly to a laboratory for analysis.
- A swab provides immediate determination of the presence of fungal spores as well as what types of fungi are present.
5.4.3.1 Areas of Concern
- Inspector shall take at least one (1) swab sample when a visual examination of the building yields moisture intrusion, water damage, apparent mold growth, musty odors, or conditions conducive to mold growth. Additional sampling may be performed at the discretion of the inspector.
5.4.3.2 Sampling
- In general, an inspector will typically hold the tube container so that the ampoule with the liquid preservative is at the top. You pinch the plastic tube so the liquid will flow down onto the swab. To remove the moistened swab, you pull on the cap. Rub and roll the wet swab over a one-inch square area of the apparent mold growth. The swab should collect visible apparent mold. Insert the swab back into the tube. Secure the cap.
5.4.3.3 Each Sample
- A unique sample number should be recorded for each swab sample. Write the number on the tube itself. The Chain-of-Custody document should have the sample number, location, date, and time of the sampling.
5.4.3.4 Each Room
- Take the sample in each room or area where there is visible apparent mold.
5.4.3.5 Each Color
- If there is apparent mold growth with different colors in the room or area, take a sample of each different colored mold. The different colors may indicate different mold types.
5.4.3.6 Each Substrate
- If mold is visible on different substrates or building materials such as wood, drywall, or wallpaper, then a sample from each different material is recommended.
5.4.4 Tape
- A tape system provides a quick way to sample visible mold. A tape-lift system is the most common surface sampling technique. It can be used instead of a swab sample. Many samples can be collected in a short period of time. Samples that show hyphae fragments and reproductive structures can provide proof of mold growth.
- One of the most popular tape sampling products is the Bio-Tape™ system. There are many advantages of using tape lift systems such as the Bio-Tape™ instead of using regular tape. Bio-Tape™ is easier to handle, the tapes are individually numbered, it requires less laboratory preparation time, and the slides are flexible and will not break.
- The sampling result is not quantitative. The presence of fungi can be confirmed, genera can be identified, and possibly a semi-quantitative estimation of the amount of each genus can be determined.
5.4.4.1 Sampling
The procedure to using a tape lift system such as Bio-Tape™ is as follows:
- Remove the slide from the mailer;
- Record the sample number and all other identification information prior to taking the sample;
- Peel off the protective liner from the slide to expose the adhesive;
- Place the slide with sticky side down on the contaminated area being sampled;
- Press down gently and make contact. Excessive pressure is not necessary;
- Lift the slide from the surface and place back into the slide mailer. Do not replace the protective liner;
- Record all information on the Chain-of-Custody document, including property address, date, time, and sample number;
- Mail the sample to the laboratory.
5.4.4.2 PPE
- Because there is direct contact with and disturbance of the contaminated area, PPE is recommended, including gloves and a respirator rated as N-95 or higher.
5.4.4.3 Each Sample
- A unique sample number should be recorded for each tape sample. The Chain-of-Custody document should have the sample number, location, date, and time of the tape sampling.
5.4.4.4 Each Room
- Take the tape sample in each room or area where there is visible apparent mold.
5.4.4.5 Each Color
- If there is apparent mold growth with different colors in the room or area, take a tape sample of each different colored mold. The different colors may indicate different mold types.
5.4.4.6 Each Substrate
- If mold is visible on different substrates or building materials such as wood, drywall, or wallpaper, then a tape sample from each different material is recommended.
5.4.5 Carpet
- A carpet tends to contain a history of any mold that has been growing in the building. The carpeting sampling is performed to reveal previous mold problems. A carpeting sampling can also reveal undetected mold growth that may have been covered over or cleaned up. Choose an area that is not heavily walked upon, an area with little traffic. Do not sample under furniture.
- A household vacuum machine and a carpet-sampling cartridge are used to vacuum a small area of the carpet. The cartridge should be inserted as deep into the pile of the carpet as possible. If a carpet has not been cleaned thoroughly prior to a sampling, a carpet can easily hold evidence of a mold problem in the house. Even after cleaning, there can be mold spores discovered deep in the carpet.
5.4.5.1 Set Up
- Insert the nylon filter into the collector nozzle. It should snap in place. Attach the device to the vacuum hose securely. An adapter may be needed. If the attachment is loose, use duct tape to make a tight connection.
5.4.5.2 Sampling
- Choose a 6-foot by 3-foot sampling area in front of the sofa or large chair where occupants spend a lot of time. Vacuum this area thoroughly. Next select a 6-foot by 3-foot area in a bedroom along side a bed. Remove filter. Place into the bag that came with the unit. Mail it to the laboratory.
5.5 Outdoor Air Sampling
5.5.1 Two Outdoor Samples
- The inspector shall perform two (2) outdoor samples of the highest quality general air to be used as control samples (or background samples). These samples to be used for comparison with the indoor sample(s).
5.5.2 Upon Arrival
- The outdoor sampling should begin soon after arriving at the property, assuming that the weather is clean and calm. It is better for an inspector to perform the outdoor sampling while the weather is favorable than to wait. The outdoor conditions may change drastically during the examination and sampling of the building interior.
5.5.3 Weather
- Air sampling should not be conducted during unusually severe storms or periods of unusually high winds. Severe weather will affect the sampling and analysis results in several ways.
- First, a high wind will increase the variability of airborne mold spore concentration because of wind-induced differences in air pressure between the building interior and exterior. Second, rapid changes in barometric pressure increase the chance of a large difference in the interior and exterior air pressures, consequently changing the rate of airborne mold spores being sucked into the building. Weather predictions available on local news stations can provide sufficient information to determine if these conditions are likely.
5.5.3.1 Clean and Calm
- On a Chain-of-Custody form, the weather conditions shall be recorded. The weather conditions should be clean and calm. High winds may affect the quality of the sampling, including the comparison between indoor and outdoor sampling.
5.5.3.2 No Rain
- Air pump sampling should not take place outdoors if it is raining. If possible, you should wait for at least two (2) hours after the rain has stopped before taking an air pump sample. Alterations or adjustments to the normal procedure or locations of taking air pump samples, particularly for the control sample, must be recorded in a Chain-of-Custody.
5.5.3.3 Above Freezing
- Air pump sampling should not take place when the outdoor air temperature is below 32° Fahrenheit. All air sampling should take place when the air temperature is above freezing.
5.5.3.4 No snow covering
- If the ground is completely covered with snow, outdoor air pump sampling should not be performed. A partial covering or a light dusting of snow is acceptable.
5.5.3.5 Ten Minutes
- On a clean windless day, air pump sampling should run for 10 minutes. (Be sure to refer to the manufacturer’s recommendation. There are cassettes that require only 5 minutes such as the Z5.) When the outdoor air is something other than clean and windless, then the time of the sampling should be reduced to 5 minutes or less. A breeze, the mowing of grass, nearby construction, and dusty air all affect the sampling conditions.
5.5.4 Location
- If possible, one outdoor sample should be located on the windward side of the building (the side facing the point from which the wind blows), and the other should be located on the leeward-side of the building (the side sheltered from the wind).
- The sampling device located on the windward side of the building should be positioned so as to face the wind directly. The sampling device should point towards the wind, in the direction of the point from which the wind is blowing. The sampling device should be three to six feet (3-6 ft.) from the ground surface (breathable space).
- Typically the device is about 10 feet away from the front entry door. The idea is to have both outdoor samples located in areas where the devices will collect a representative sampling of the air that may enter the building through the entry door or nearby open windows (the openings on the sides of the building).
5.5.4.1 Ten Feet
- If there is a main ventilation component of the building that draws into the building fresh air from outside, sampling should be performed ten feet (10 ft.) feet from that intake.
- The sampling should be performed at least ten feet (10 ft.) from the most frequently used entrance to the home.
- The air sampling devices should be kept at least ten feet (10 ft.) away from all openings, air intakes, registers, exhaust vents, vent pipes, ventilation fans, etc.
5.5.4.2 Nothing Overhead
- Sampling should not be performed under an overhang, soffit or eave; carport; porch roof, or any other roof or overhead structure.
5.6 Indoor Air Sampling
5.6.1 Closed-Building Conditions
- Indoor air sampling should be made under closed-building conditions. Closed-building conditions are necessary for in order to stabilize the air that may contain mold spores or mVOCs, and to increase the reproducibility of the air sampling and measurement.
- Windows on all levels and external doors should be kept closed (except during normal entry and exit) during the sampling period. Normal entry and exit include a brief opening and closing of a door, but–to the extent possible–external doors should not be left open for more than a few minutes.
- In addition, external-internal air exchange systems (other than a furnace) such as high-volume, whole house and window fans should not be operating. However, attic fans intended to control attic and not whole building temperature or humidity should continue to operate. Combustion or make-up air supplies must not be closed.
- Normal operation of permanently installed energy recovery ventilators (also known as heat recovery ventilators or air-to-air heat exchangers) may also continue during closed-building conditions. In houses where permanent radon mitigation systems have been installed, these systems should be functioning during the air-sampling period.
- Closed-building conditions will generally exist as normal living conditions in northern areas of the country when the average daily temperature is low enough so that windows are kept closed. Depending on the geographical area, this can be the period from late fall to early spring.
5.6.2 HVAC
5.6.2.1 Take One Air Sample
- At least one (1) air sampling shall be taken at an air supply register of the HVAC system. It is preferred to sample prior and during the operation of the HVAC system. If only one sampling can be performed, then the sampling should be taken 15 minutes after the HVAC system is turned on.
- Ideally, there would be at least three sampling devices similarly situated throughout the building, but financial or time constraints may limit the number of samples that can be taken.
5.6.2.3 Location
- The air sample should be taken three to five feet (3-5 ft.) from an air supply register, with the sampling device oriented so that air from the supply register directly enters the sampling device.
5.6.2.4 Agitation
- A gentle or vigorous mechanical agitation of the ductwork (a bump or shake) is appropriate.
5.6.3 Indoor Air
5.6.3.1 Take One Air Sample
- The inspector shall perform at least one (1) indoor sample. Additional samples may be performed at the discretion of the inspector.
5.6.3.2 Areas of Concern
- At least one (1) air sample shall be taken near the center of EACH room or area of the building in which there are areas of concern (moisture intrusion, water damage, musty odors, visible apparent mold growth, and conditions conducive to mold growth).
5.6.3.3 No Areas of Concern
- At least one (1) indoor air sample shall be taken in the most lived-in common room, such as the family, living, or entertainment room (The location shall be determined at the discretion of the inspector).
5.6.3.4 Location
- An indoor air sampling should only take place in a livable space in the building. Sampling in areas such as closets, under-floor crawlspaces, unfinished attics, storage or utility rooms, or inside the HVAC system is prohibited.
- The indoor air sample should be taken in the middle or center area of the area or room.
- The air collection device should be at head height (about three to six feet above the floor surface).
5.6.3.5 Ten Minutes
- Inside the building, the air pump sampling should run for 10 minutes. If there is a lot of indoor activity, then the air pump sampling should be reduced to 5 minutes. If there is an active source of dust, such as construction or cleaning, then the air sampling time should be reduced to 1 minute. Be sure to follow the recommendations of the manufacturer of the sampling device or collector; there are some devices that are designed to take a sample in 5 mintues (i.e. Z5 cassette).
5.6.4 Sampling
- The sampling equipment must be protected, clean, and properly maintained at all times. The sampling device shall be clean, free from dirt or debris prior to starting a sample. If re-usable collection devices are used, then they shall be handled and cleaned prior to use in accordance with the manufacturer’s recommendation. The collector may re-usable and have sticky slides already prepared, or the collector may be a one-time-use self-contained device.
- Slides, cassettes, and one-time-use devices should be stored in cool, dry environments. The slides must be protected from direct sunlight. Sampling devices (slides, swabs, cassettes, tapes) older than one year should not be used.
- Set the air collector at a normal breathing height, which is about 3 to 6 feet above the ground level or floor surface. A tripod is typically used to set the collector height.
- Calibrate the flow of the pump. Do not attach the sampling device, cassette or collector on the tubing yet. Measure the flow rate of the pump with a rotameter that has been calibrated to a standard. Make sure that the flow rate is set to the manufacturer’s recommendation. For example, an Air-O-Cell cassette flow rate is 15 liters of air per minute. The pump should be calibrated regularly (once a day). A record of calibrations should be kept in a work ledger or logbook.
- After calibration, securely attach the tubing of the pump to the sampling device or collector. Turn on the pump. Start sampling. Record start time.
- After turning on the air pump, check the airflow rate. The flow rate should not vary. A flow change greater than five percent (5%) requires a new air sample to be taken. All air samples must have the same volume. A digital time controller on the equipment is highly recommended.
- Examine the collector. There should not be an overload on the slide. There should be a fine trace, hardly visible to the human eye, of dust and spores on the slide. A slide that has an easily visible trace on it may be unreadable. If that is the case, the environmental conditions may need improvement or a new sampling location may be needed. If a slide is heavy, a new sample should be taken.
- Remember, all air samples must have the same volume. Refer to manufacturer’s recommendations about sampling time and volume for each type of sampling device.
- Record the time that the pump stopped. Mark the sampling device with a unique sampling number. Record that information on the Chain-of-Custody.
- Place slides in a protective carrying case. Or close the collector if a cassette is used. A new sample must be taken, if a slide is accidentally touched, smeared, or contaminated, because it will be unreadable.
- Calculate the volume by multiplying the liters of air pumped by the number of minutes. An example of the calculation is 20 liters of air pump multiplied by 10 minutes equals 20 liters per minute equals 200 liters (20L x 10 minutes = 200 L).
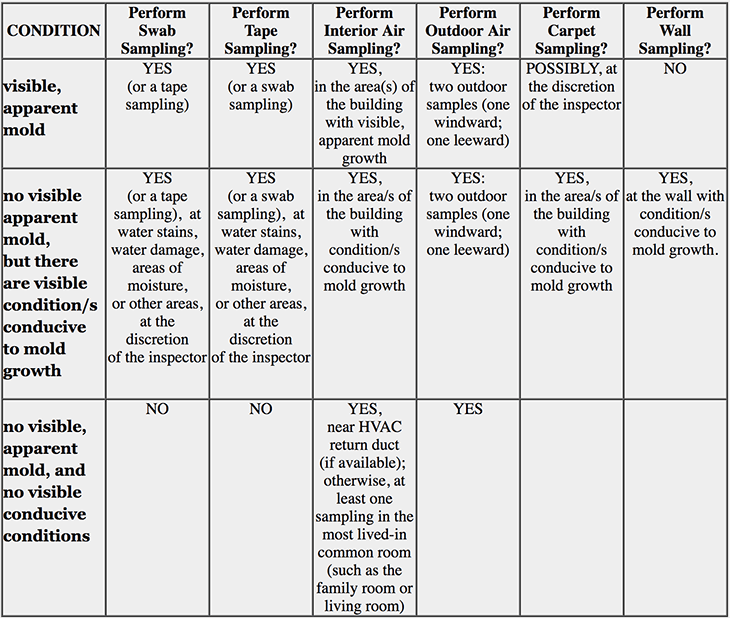
5.7 Mold Sampling Decision Chart
IAC2 Mold Sampling Decision Chart
6.0 Limitations & Exclusions
6.1 Limitations:
I. These Standards of Practice apply only to residential buildings with four or fewer dwelling units.
II. The mold inspection is not a warranty, guarantee, or insurance policy.
III. The mold inspection is not technically exhaustive.
IV. The mold inspection will not identify concealed or latent conditions or defects.
V. The mold inspection will not identify mold growth not readily visible at the time of the inspection.
VI. The scope of a mold inspection does not include future conditions or events
VII. The scope of a mold inspection does not include hidden mold growth or future mold growth.
6.2 Exclusions:
I. The inspector is not required to report:
A. The condition of any system or component that is not readily accessible
B. The condition of any system or component that is not in the IAC2 Standards of Practice.
C. The service life expectancy of any system or component.
D. The size, capacity, BTU, performance, or efficiency of any component or system.
E. Compliance with codes, regulations or installation guidelines.
F. The presence of evidence of rodents, animals, insects, wood destroying insects and pests.
II. The inspector is not required to:
A. Determine the presence of hidden mold by physical examination or sampling.
B. Report replacement or repair cost estimates.
C. Lift carpeting or padding.
D. Inspect any other environmental issue.
E. Determine the cause or reason of any condition.
F. Perform a geotechnical, structural, geological evaluation.
G. Move any personal items or other inspection obstructions, such as, but not limited to: insulation, throw rugs, furniture, floor or wall coverings, ceiling tiles, window coverings, equipment, plants, ice, debris, snow, water, dirt, foliage, or appliances.
H. Dismantle, open, or uncover any system or component.
I. Enter or access any area, crawlspace, or attic space, which, in the opinion of the inspector, may be unsafe or may risk personal safety.
J. Do anything that may be unsafe or dangerous to the inspector or others or damage property according to the opinion of the inspector.
K. Determine the insurability of a property.
III. The inspector is not required to operate:
A. Any system that is shut down.
B. Any system that does not function properly.
C. Any system that does not turn on with the use of normal operating controls.
D. Any shut off water or fuel valves or manual stop valves.
E. Any electrical disconnect or over current protection devices.
F. Any irrigation or sprinkler systems.
7.0 Definitions
7.1 Accessible: Can be approached or entered by the inspector safely, without difficulty, fear or danger.
7.2 Apparent Mold: visible growth with characteristics of mold, which cannot be confirmed by the inspector without the benefit of sampling. The term “mold growth” is interchanged in this course with “fungal growth” and “microbial growth.”
7.3 Area of Concern: A room or area with moisture intrusion, water damage, musty odors, visible apparent mold growth, and conditions conducive to mold growth.
7.4 Complete: Comprehensive in scope or purpose.
7.5 Component(s): A permanently installed or attached fixture, element or part of a system.
7.6 Condition(s): The visible and conspicuous state of being of an object.
7.7 Dismantle: To open, take apart or remove any component, device or piece that would not typically be opened, taken apart or removed by an ordinary occupant.
7.8 Due Diligence: The degree of care and caution required by the circumstances of a person.
7.9 Dwelling Unit: A complete place to live including a kitchen and bathroom.
7.10 Household Appliances: Kitchen and laundry appliances, room air conditioners, and similar appliances.
7.11 Invasive: To probe, dismantle or take apart a system or component.
7.12 Interior: The area(s) of a building where people have access and are included in the condition space of the building.
7.13 Limited: Not comprehensive in scope or purpose.
7.14 Microbial: Microscopic organism such as mold.
7.15 Normal Operating Controls: Devices such as thermostats that would be operated by ordinary occupants, which require no specialized skill or knowledge.
7.16 Occupants: Tenants, persons, or entities each of which uses a portion of the building.
7.17 Readily Accessible: An item or component is readily accessible if, in the judgment of the inspector, it is capable of being safely observed without movement of obstacles, detachment or disengagement of connecting or securing devices, or other unsafe or difficult procedures to gain access.
7.18 Report: A written communication (possibly including digital images) of conditions seen during the inspection.
7.19 Representative Number: At least one in a particular room or area.
7.20 Sampling: The collection of air, surface, or carpet samples for analysis.
7.21 Shut Down: Turned off, unplugged, inactive, not in service, not operational, etc.
7.22 Inspect(ed): To visually look at readily accessible systems and components safely, using normal operating controls and accessing readily accessible panels and areas in accordance with these Standards of Practice.
7.23 Inspector: One who performs an inspection.
7.24 System(s): An assembly of various components to function as a whole.
7.25 Technically Exhaustive: A comprehensive and detailed examination beyond the scope of a mold inspection which would involve or include, but would not be limited to: dismantling, specialized knowledge or training, special equipment, measurements, calculations, testing, research, analysis or other means.
7.26 Unsafe: A condition in a readily accessible, installed system or component, which is judged to be a significant risk of personal injury during normal, day-to-day use. The risk may be due to damage, deterioration, improper installation or a change in accepted residential construction standards